Blending Colored Pencils with Rubbing Alcohol

In one of my latest drawings, the background is blurred to focus on the subject in the center. Such large areas always come out kind of grainy for me (particularly since I’m working my way through a set of rather cheap pencils for practice, so I thought I’d give blending with solvents a try. I don’t have any proper colored pencil solvents, but I do happen to have 99% rubbing alcohol for another project.

Before and After

The effect was subtle, but definitely there, especially in the pavement. Certainly enough to play with it some more, maybe with some of the better quality pencils that I have.

Migrating from Promises to Observables in Grafana Plugins

Recently, I decided to write a Grafana datasource plugin that would collect data from the NASDAQ Data Link website and graph it. It was a good way to learn a bit more JS, React and add some new data to a dashboard I am building.
So as I started following the Datasource plugin tutorial and writing my plugin, I noticed the following error in my code:

The function datasourceRequest is marked as deprecated.

The function datasourceRequest() is deprecated in favor of the fetch() function. fetch() however, returns an RxJS Observable and not a Promise. Luckily, the prototype for the query() function allows us to return an Observable instead of a Promise if we want:

/**
   * Query for data, and optionally stream results
   */
  abstract query(request: DataQueryRequest<TQuery>): Promise<DataQueryResponse> | Observable<DataQueryResponse>;

There isn’t much documentation on how to migrate from Promises to Observables in this situation, and being fairly new to it, the solution wasn’t immediately obvious to me. So, after a bit of reading, this is how I changed it.

Promise Based Example

This is what we start with (full code on Github):

// Async because it returns a promise  
async doRequest(path: string, apiParams: Record<string, any> | undefined = undefined): Promise<FetchResponse> {
    const result = getBackendSrv().datasourceRequest({
      method: "GET",
      url: this.instanceUrl + "/quandlApi" + path,
      params: apiParams
    });

    // We don't need to do anything to the response, we simply return the promise 
    //  that we get from the datasourceRequest function
    return result;
  }

// Async because we again return a promise
async query(options: DataQueryRequest<MyQuery>): Promise<DataQueryResponse> {

    // Process each query individually....
    const promises = options.targets.map((query) => {
            // Take the info in the query and get it ready for the request
            // not shown
            // ......

            // Call doRequest, and provide a handler to the Promise through then()
            // Return the result.
            return this.doRequest(apiPath, Object.fromEntries(apiParams)).then((r) => {
              // Start building the dataframe
              let df = new MutableDataFrame({
                refId: query.refId,
                fields: [],
              })
  
              // More dataframe building
              // ......
              for(const r of dataset_data.data) {
                df.appendRow(r);
              }
              
              // Return the Dataframe
              return df; 
            })
    });

    // Merge all the promises from all the queries into one big promise 
    //   and return it. 
    return Promise.all(promises).then((data) => ({data}));
}

Doing the same thing using Observables – My First (Naïve?) Approach

RxJS has some good documentation on how to use Observables here. It discusses the primary difference, which is that the callback function can return multiple updates instead of just the one that a Promise can return.

Essentially, when you want to do something long running, you create an Observable object and provide it with a function that does the task and notifies the subscriber when the result is available.

To kick off the execution, you subscribe to the Observable and provide it with 3 call backs:

  • next() – Handle the result of the long running request. Can happen multiple times
  • error() – Handle an error in execution
  • complete() – Do something when the Observable notifies that the task is complete.

In this case, we need to wait for the raw data to come back from the api and then process it, and Grafana needs to wait for the processed data. So we are working with two nested Observables.

First we build the Observable that we are going to return to Grafana.

   const queryObservable = new Observable<DataQueryResponse>((subscriber) => {

In the closure we pass to the new Observable, we call doRequest() and subscribe to the returned Observable (the one that notifies us when raw data is available) providing an object with 3 closures (next(), error(), and complete()).

        let response: Observable<FetchResponse> =  this.doRequest(apiPath, Object.fromEntries(apiParams));
        let respSubscriber = response.subscribe({
          next(r) { 
            //console.log(`Response for query ${query.refId}`);
            //console.log(r);

            if(r.status !== 200) {
              subscriber.error(`Unexpected HTTP Response from API: ${r.status} - ${r.statusText}`);
              return;
            }

// Do something with the raw data

Once the processing is done, our Observable notifies Grafana about it using subscriber.next().

            // Alert the subscriber that we have new formatted data. 
            subscriber.next( {data: [df] } ); 

When the fetch Observable calls complete(), we do the same:

          complete() { 
            // Once we are done reading the response, we can call it complete here too. 
            subscriber.complete(); 
            respSubscriber.unsubscribe()
          }

doRequest() is basically the same as before, but we specify an Observable instead of a Promise as the return type and drop the async keyword. Leaving async in throws an error because it requires the return type to be a Promise.

  doRequest(path: string, apiParams: Record<string, any> | undefined = undefined): Observable<FetchResponse> {
    const result = getBackendSrv().fetch({
      method: "GET",
      url: this.instanceUrl + "/quandlApi" + path,
      params: apiParams
    });

    return result;
  }

Finally, we return our Observable back to the map function to be added to the Observables array and use merge() to combine them to be returned to Grafana.

     return queryObservable;
    });

    // The query function only returns one observable. we use merge to combine them all?
    return merge(...observableResponses);

And that’s that. We have reworked the query() function to use Observables.

Using Pipe and Map

As I was doing further reading on the topic, I came across arguments that nested Observables were not the best approach, and that pipe and operators like map() were the correct approach. This actually simplifies things quite a bit.

RxJS Documentation on Operators

First we move all of the processing out of the outer Observable and into its own function. See the signature of that function below:

// Process responses from a timeseries api call. 
// We need to receive the refId as well, because we add it to the data frame. 
handleTimeSeriesResponse(r: FetchResponse, refId: string): DataQueryResponse {

Next we use the pipe() and map() operator to process any data coming from the inner Observable. The result is an Observable that can be given back to the query function just like before.

// Use pipe to map a processing functon to the observable returned by doRequest. 
// We need to add a parameter to the function, so we make a closure that calls the function with both the response and the refId.
return this.doRequest(apiPath, Object.fromEntries(apiParams)).pipe(map(resp => this.handleTimeSeriesResponse(resp, query.refId)));

The full code I used in the Nasdaq Data Link data source for all three scenarios can be found here:

Adding a countershaft to the lathe

When turning metal on a lathe, the speed of the workpiece is quite important. Too slow and you tend to get a rough cut, too fast and the material work hardens.

In Donald de Carle’s The Watchmaker’s and Model Engineer’s Lathe: A Users Manual, de Carle presents a table of recommended speeds for turning different metals.

This image has an empty alt attribute; its file name is IMG_20220628_231417-1024x927.jpg

The lathe motor that I have seems to run (as measured by a handheld tachometer) between 0-6000rpm and has very low torque at the lower speeds. Some speed adjustment was possible right away with the cone pulleys on each. The below table shows the (calculated) gear ratios for each belt position.

Lathe Pulley vs Motor Pulley20mm24mm26mm
32mm1.6:11.3:11.2:1
42mm2.1:11.75:11.6:1
52mm2.6:12.2:12:1
62mm3.1:12.6:12.3:1
Calculated gear ratios

Based on the table above and my first attempts at turning a winding stem, I needed to gear down my lathe a bit more in order to spin the workpiece at the right speed and stay within a decent part of the torque curve for my motor. In order to accomplish this, I ended up purchasing a 16mm pulley, a 58mm pulley, a few 8mm stainless rods and some pillow block ball bearings. This was expected to provide a 3.6x reduction in speed between the motor shaft and the countershaft. Further adjustments could be made using the original cone pulley’s on the lathe and motor.

Once installed, I tested the setup and measured the following ratios

Belt Position on PulleysMotor SpeedSpindle SpeedMeasured Ratio
62mm:20mm390029013.4:1
52mm:24mm40004159.6:1
42mm:26mm40006006.6:1
30mm:26mm40007005.7:1
Motor speed vs Spindle Speed for each Gear ratio

The real ratios are off a bit, perhaps due to measurements that weren’t perfectly precise, but it’s not too far off. If anything this new pulley may be a little aggressive and I might have been better of going with the 48mm one instead.

Weeknight Curried Chicken

I love curry. Seriously. Curries of all kinds. But… a lot of the curry recipes I’ve found can take hours to make and require trips to special stores like H Mart, or if they are quick, they tend to be bland and underwhelming.

So finally, when I found an awesome medium spicy curry powder that I wanted to try out, I bit the bullet and combined a few recipes to make my own. One that has lots of flavor, is made from ingredients I keep around the house or that are readily available at the local supermarket and only takes me about an hour to cook!

On canned coconut milk: This recipe calls for canned coconut milk, but doesn’t use the whole can. For a while I struggled to figure out what to do with the rest of a can when I used one, until I learned you can just freeze it. So now, I put the remainder in a container and freeze it. When it thaws, the fats will have separated out, but a few blasts with an immersion blender and they emulsify back in just fine.

Recipe

Ingredients

  • 1 Shallot (diced) or small onion
  • 4 cloves garlic (minced)
  • 1 tsp ginger (minced)
  • ~ 2 Tbsp medium spice curry powder
  • 1 tsp salt
  • ½ – ¾ tsp black pepper
  • Several bay leaves
  • 6 chicken thighs
  • ¾ cup diced tomatoes
  • ½ cup coconut milk
  • ¼ cup water
  • 2 tsp brown sugar
  • 1 tsp white vinegar

Steps

In a large sauce pan, heat 1 tbsp of oil and toss in shallot, garlic, ginger. Cook until soft

Add spices and cook a few minutes until fragrant

Add chicken and tomatoes to pan, stir to coat and cook uncovered for 10 minutes over medium high flame. Stir occasionally to prevent burning

Add coconut milk, water, vinegar and sugar to pan. Bring to a boil, reduce heat and simmer covered for 15-20 minutes. Stir occasionally.

Taste and adjust accordingly

If the sauce is not thick enough, simmer uncovered for another 10 minutes to thicken.

Trying Out the Watchmakers Lathe

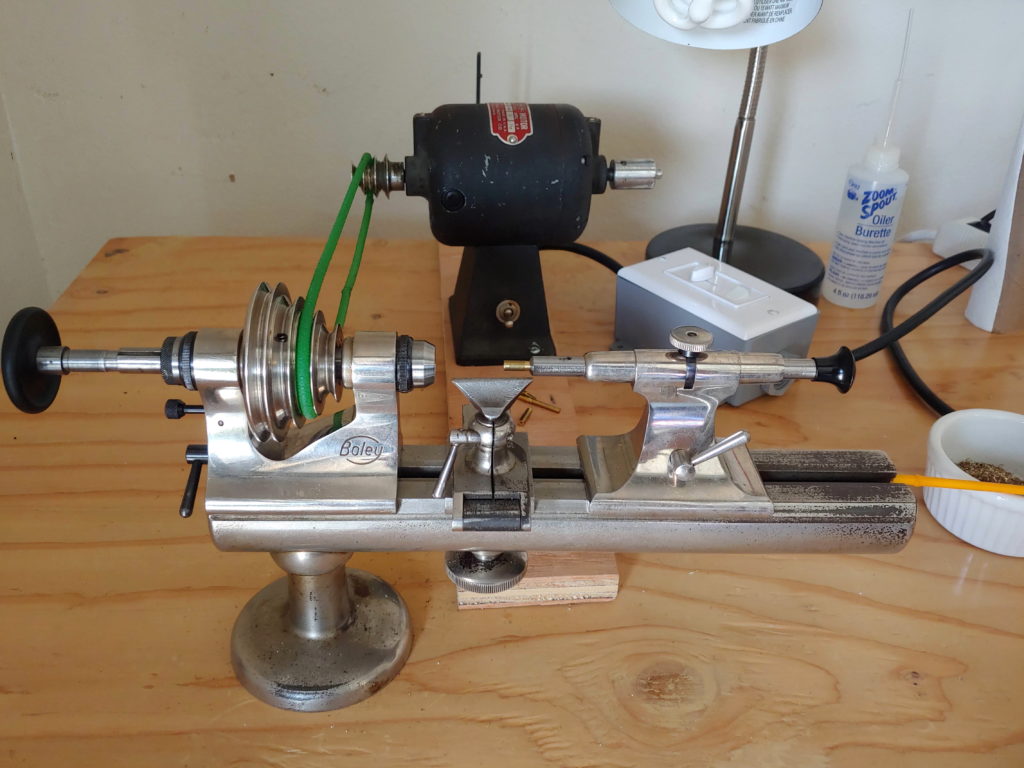
A while back, I purchased a vintage Boley watchmakers lathe to work with, but life got in the way and I wasn’t able to do the work needed to get it running. Over the Christmas break, I pulled it out and started working on it.

Lathe Cleanup

Major lathe parts
The major lathe parts

The first step was to disassemble, clean and oil the lathe itself. Luckily, it came fairly clean and just needed a decent coat of oil. I purchased some light sewing machine oil from the local Joann’s and got to work. The tailstock, tool rest and lathe body are pretty straightforward to disassemble; just unscrew a few bits and off you go.

The headstock was more complicated.

Disassembled headstock

In order of operations:

  1. Remove Drawbar
  2. Remove oil hole covers on either end
  3. Unscrew adjustment nut
  4. Remove set screw on pully
  5. Remove left hand cone bearing
  6. Slide lathe spindle out

Once everything had been cleaned and oiled, I reassembled it and set it aside.

Setting up the motor

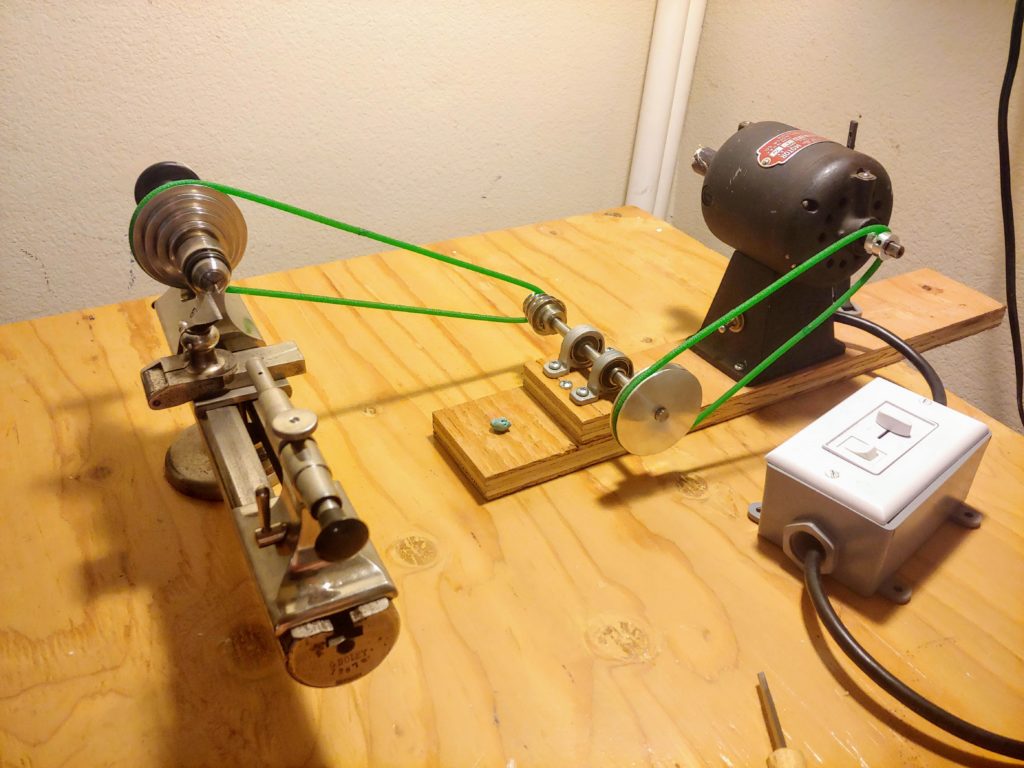
Along with the lathe, I purchased a small 1/12 h.p. Vigor motor with a pully attachment and variable speed foot pedal. This worked fairly well out of the box, but the foot pedal had some damage that caused it to stick when you let go. Additionally, the wiring was very old, cracked and showing the paper insulation inside. I decided to replace it with new wiring and a dimmer control instead of a foot pedal.

After a bit of cutting and soldering the new controller was in place. It consists of a dimmer light switch in the middle of a chopped up extension cord. This allows me to adjust the speed of the motor as needed and turn it off and on. While researching this, it was pointed out that a lot of AC motors don’t like variations in voltage and will heat up and potentially be damaged. These motors are instead controlled by varying the frequency of the power. Luckily, mine works just fine with varying voltage and I could tell this was the case going into it, since the original foot pedal does just that.

Motor and Dimmer
Motor and speed controller

For now, it’s screwed to a piece of plywood which is clamped to the bench. This is just to provide really simple adjustments to its position relative to the lathe. They are connected with a short length of fusible round transmission belt.

Misc Tools

After this, the only thing that was missing was a few collets, a couple of gravers and some raw stock to try out. This lathe conforms to the Webster & Whitcomb standard and Sherline products makes lathe collets for that type, so I purchased a starter set from them that came with 5 metric collets. The raw stock was picked up from Esslinger.

I decided, for the time being, not to buy special gravers. Instead, I came across an idea on a few forum posts about using concrete nails (which are hardened and tempered already). 7 bucks for a box of nails and some time at a bench grinder and arkansas stone and I now have a couple gravers to play with. To make things easier, I also ground off the heads and pressed them into a short length of wooden dowel to make a rudimentary handle.

Concrete nail gravers
The progression from raw nail to simple hand graver.

They seem to work ok, but I’ve noticed that the edge gets dull a lot quicker than I expected for a soft metal like brass. I’m not sure if I damaged the temper (I did try not to let it heat up, but perhaps I wasn’t as successful as I thought), so I may need to try making a new one and seeing if it works any better.

First Cuts…

Once everything was set up, I gave it a spin. The results are below. A couple of miniature belaying pins. The short one was done entirely free hand, the long one was an attempt at making one to specific measurements based off a real one on one of the ships I volunteer on in my free time. Not bad for a first try!

Miniature belaying pins in brass
I definitely need to work on the polish, but I am quite satisfied for a first try!

Baggywrinkle: Or what’s that fuzzy stuff on the ship?

It happens quite often. You visit a tall ships festival at a nearby harbor and on all of the ships you see these:

Exy Johnson
Brig Pilgrim

So you turn to one of the crew members and you ask, “What are those fuzzy caterpillar looking things up there?” And they smile and answer “Those are Baggywrinkle. ” (No joke, this is a pretty common question to be asked and one of my favorites)

But What Exactly is Baggywrinkle?

Baggywrinkle is a form of chafe gear that is attached to points on the ship where a sail might rub against it. The goal is to provide a soft surface that will not wear a hole through the fabric of the sail. I have most often seen it attached to the lifts that hold up a boom (example: the Spanker on the Brig Pilgrim) where the sail is going to be blown against the leeward lift.

Weathered Baggywrinkle on the Spanker lifts on the Brig Pilgrim
Weathered Baggywrinkle on the Brig Pilgrim
View from above

How it’s made

Baggrywrinkle is actually made of old rope that has been deconstructed, cut into short lengths and tied to stretched lengths of seine twine. Once it has been made, it is wrapped in a spiral around line or spar in question. As you can imagine, it takes a lot of work to create enough baggywrinkle to make a difference, but it is a great chance to sit and socialize with your crewmates or (if the place you are making it is open to the public) a great way to engage the public and start a conversation with them about tall ships and sailing.


Rope is first cut into short lengths and then unlaid until you are down to the individual yarns that make up the strands of the rope. We keep a large trash bag full of this baggywrinkle material around for when we start making it.
The individual yarns are tied to pieces of twine that are stretched between two posts. Note the strand in the background that has not been jammed in place yet.
The finished strands of baggywrinkle are fluffed out and then wrapped around a lift.
A completed lift with several segments of baggywrinkle applied.